In this series, I will be discussing my Servants of the Apocalypse list building and presenting battle reports as I relearn MCP after a very long hiatus and learn to play the Servants of the Apocalypse affiliation.
With this being my first game in a long time and my first game with Apocalypse, I discussed a lot of my moves with my opponent, who was very patient with me thinking things through. I want to thank him for that. My opponent brought a Guardians of the Galaxy roster.
Turn 0
Rosters
The roster that I faced was:
Characters (10)
Agent Venom (4)
Beta Ray Bill (4)
Groot (3)
Rocket Raccoon (2)
Star-Lord (3)
Yondu (4)
Captain America (Sam Wilson) (3)
Nick Fury (4)
Hulk (6)
Cosmic Ghost Rider (6)

Team Tactics
Deadly Duo
Foreign Assignment
Galaxy‘s Greatest Lovable Misfits
Brace for Impact (R)
Sacrifice (R)
Recalibration Matrix
Eye In The Sky
Survival Plundered Goods
Secure Crisis
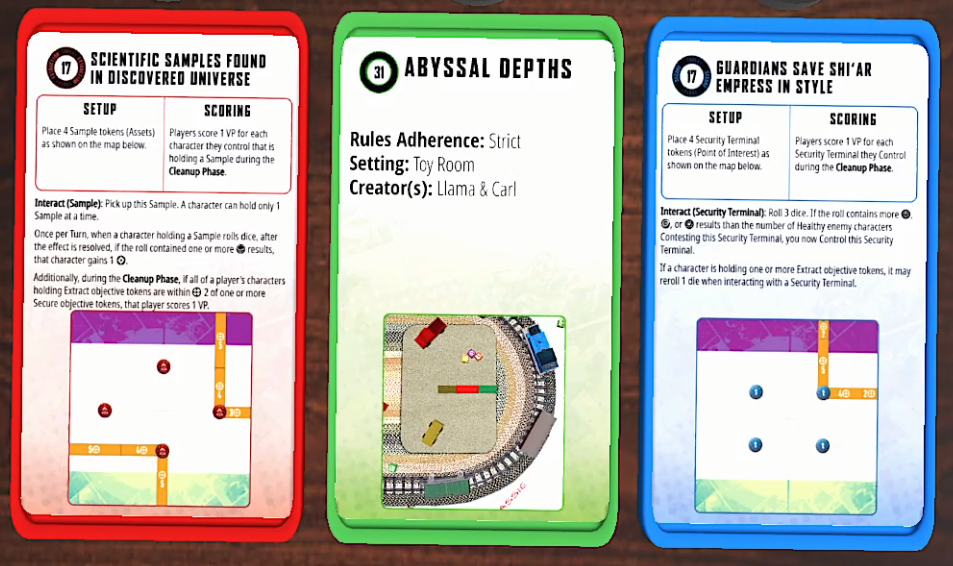
Infinity Formula Goes Missing! (B, 17)
Guardians Save Shi‘ar Empress in Style (M, 17)
M‘Kraan Crystal Gets Heroes Home! (G, 19)
Extract Crisis
Fear Grips World As Worthy Terrorize Cities (D, 18) Unexpected Guests Crash Royal Wedding (N, 17)
Mutant Extremists Target U.S. Senators! (L, 19)
My initial roster, which will be changed before my next game, was:
Characters (10)
Apocalypse (6)
Beast (3)
Casandra Nova (5)
Deadpool (3)
Iceman (3)
Magik (3)
Mister Sinister (4)
Psylocke (4)
Toad (2)
Wolverine (4)

Team Tactics
Brace for Impact (R)
Crimson Dawn
Immortal Servants
Journey Through Limbo
Mental Domination
Recalibration Matrix
Sacrifice (R)
Survival
The First One
Weapon X

Secure Crisis
Guardians Save Shi‘ar Empress in Style (M, 17)
M‘Kraan Crystal Gets Heroes Home! (G, 19)
Mutant Madman Turns City into Lethal Amusement Park (B, 18)

Extract Crisis
Deadly Legacy Virus Cured? (C, 19)
Scientific Samples Found in Discovered Universe (D, 17)
Unexpected Guests Crash Royal Wedding (N, 17)
Crisis Selection
I won priority and chose my extracts, since all of his secures were okay for me and it maximized the probability of forcing 17 threat. We ended up on:
With us playing at 17 threat, I chose to run the standard squad of Apocalypse, Toad (Death), Beast (Pestilence), Deadpool (Famine), and Magik (War). After more games, I will hopefully know when to deviate from this, such as when to play Deapool as War and Magik as Famine or to swap in Iceman. For Team Tactics Cards, I selected Brace for Impact, Immortal Servants, Journey Through Limbo, Recalibration Matrix, and Sacrifice.
My opponent selected the squad of Star Lord, Nick Fury, Rocket, Beta Ray Bill, and Yondu. For Team Tactics Cards, he brought Brace for Impact, Sacrifice, Eye in the Sky, Lovable Misfits, and Galaxy’s Greatest. I actually question bringing Brace for Impact this game, since my roster does not contain a lot of throws, particularly at 17 threat.
Deployment
Since I had priority, I placed Apocalypse right in-front om my home extract. My opponent did the same, just with Rocket. Since I had priority, I knew that I could go for a safe midline extract grab with Toad. I deployed him such that he could grab the objective and be behind a Size 4 train to block line-of-sight, since his squad had a lot of long-range attacks. The trade-off here was that that meant that he would not be on a secure, losing me 1 VP from Scientific Samples. I’ll need to think and play more to know if this trade was worth it. My opponent then deployed Yondu across from Toad. This is where I think that I made a deployment mistake. I deployed Beast on the opposite side of the table from Toad. In hindsight, I should have waited to see more of his deployment before placing down Beast, since getting Poison and Root on priority targets can be almost game winning. With me having priority, however, the potential to do so is limited in this case, since my opponent could just wait to deploy his priority character until after I deployed Beast. My opponent deployed Nick Fury across from Beast. I then deployed Deadpool on the same side as Toad. My opponent then deployed Star Lord in the middle of the board. I responded by deploying Magik across from Nick Fury to threaten him. My opponent then deployed Beta Ray Bill across from Deadpool.
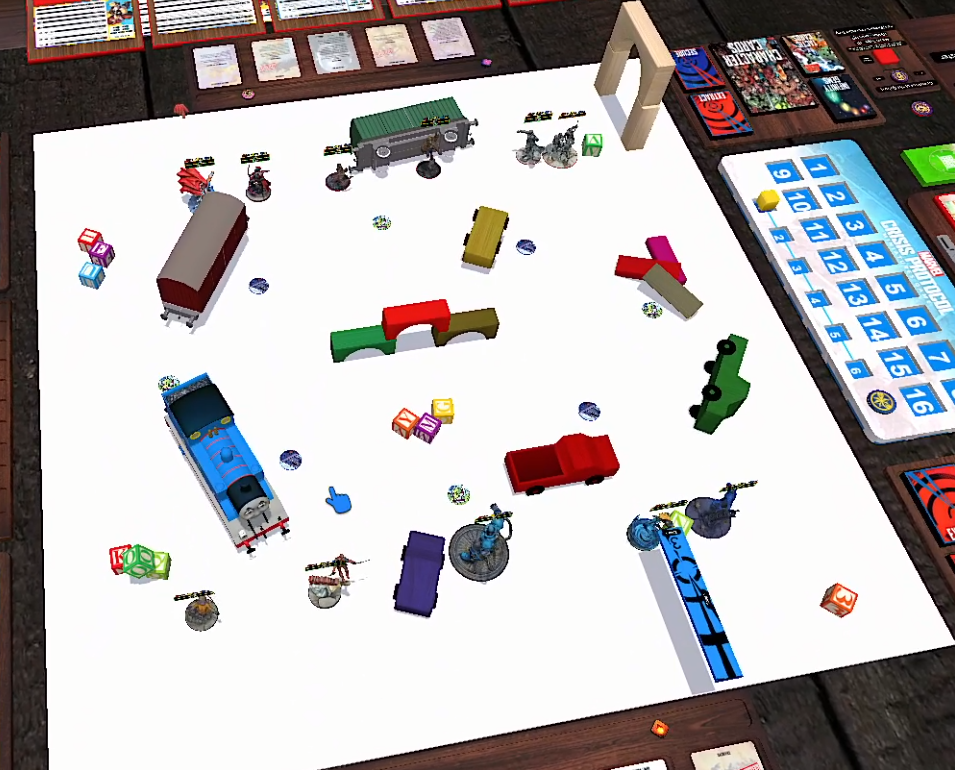
Gameplan
This deployment made me think that my gameplan should be to attack Nick Fury, flip all of the secures, and then rotate to my opponents strong side while just having Toad and Deadpool stall for time. This meant that I would look to have Apocalypse go to my right.
Turn 1
As expected, my first activation was Toad, who walked to within Range 2 of the left extract and grabbed it while remaining behind the train. My opponent responded by activating Nick Fury and having his grunts pick up the extract, since, when they drop extracts, my opponent would be able to place it. Nick Fury just waddled onto the closest secure and flipped it. With Nick Fury being the only enemy character on that side of the board, I knew that I could activate Magik and keep her out of threat range from the rest of my opponent’s characters while being able to try and flip a secure. I moved her onto the secure and successfully flipped it. I then had Magik use her Range 4 attack into the grunts to try and generate some Evolution Tokens and to get the extract onto a more prime target. Magik ended up KOing the grunts. My opponent placed the extract within one move of Star Lord.
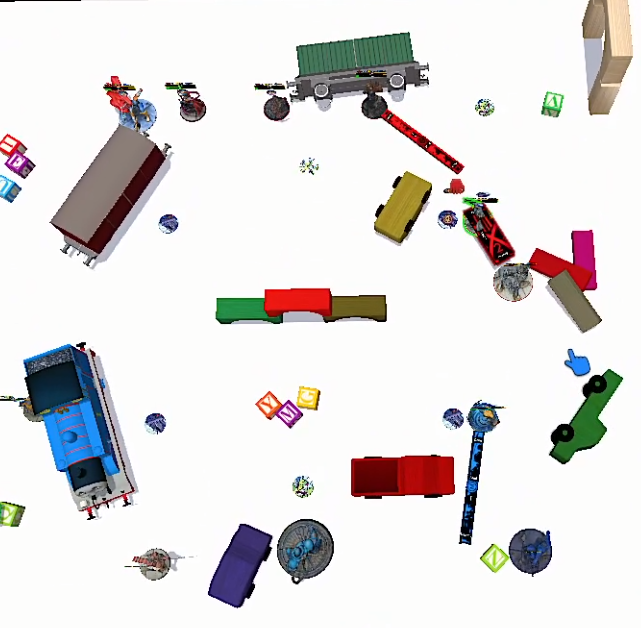
My opponent then had Star Lord pick up the extract and hide behind the yellow car. To prevent Beta Ray Bill from double walking and easily flipping my left secure, I went with Deadpool. I ended up positioning him to far forward, leaving him in Yondu’s threat range. Ending Deadpool’s activation Range 3 away from enemy characters generated an Evolution Token. My opponent responded by double moving Bill onto the closest secure and flipping it. With me want to rotate from right to left, I realized that Beast was on the wrong side of the table. Instead of just double moving and using Consuming Blight onto one character, I decided to reposition him to be able to affect the right side of the board next turn. I move Beast to the middle of the board. I think that my opponent and I messed up here. We played the center terrain feature as Size 4. That meant that we played it as blocking line-of-sight to Beast.

My opponent then had Rocket move, pick up the closest extract, and then move onto the closest secure to my right. Following my initial gameplan, I had Apocalypse pick up an extract and the use Vanish Into Dust using two Evolution Tokens and an advance to get into Range 3 of Nick Fury. Apoclypse then used his builder, doing four damage, using an Evolution Token for a reroll. This set Nick Fury up to be dazed at the top of Turn 2. My opponent could have potentially kept Star Lord within Range 2 of Nick Fury to make this more difficult using Sacrifice. My opponent punished my poor Deadpool position by having Yondu walk onto the closest secure, attacking Deadpool, and doing three damage.
At the end of Turn 1, my opponent scored 5 VPs and I scored 4 VPs.
Turn 2
In the power phase, I had the option of using Celestial Technology. I could have placed Magik closer to Nick Fury. With Nick Fury having Eye in the Sky, I did not think that Magik could consistently take out Nick Fury. Also, doing so would have meant that I would not be guaranteed to be able to use both Vanish Into Dust with Apocalypse and Consuming Blight with Beast. This was due to me spending an Evolution Token for a reroll on Apocalypses attack. As I play and analyse more games, I’ll need to track and learn from how I spend Evolution Tokens. I ended up not choosing to use Celestial Technology.
My folly with Deadpool made it so that I had to decide between likely letting Deadpool daze and dazing Nick Fury. Since Deadpool did not have an extract and my gameplan was to rotate to the right as fast as possible, I went with Apocalypse. He dazed Nick Fury with his builder, used Vanish Into Dust to get onto the secure, and then did five damage to Star Lord with a second builder, leaving him on one. After all of that, he successfully flipped the secure.

My opponent went with Star Lord and spendered into Apocalypse.
In response to that ghastly sight, I used Recalibration Matrix. This ended up saving Apocalypse from a lot of damage. After the reroll, Apocalypse took two damage, healing one of that, and was given the Shock and Slow condition. Star Lord then moved to the closes right secure.
Threatening Star Lord then allowed me to have an activation with Deadpool. I used Vanish Into Dust to get within range of Star Lord and used Bang. My opponent used Sacrifice to have the attack target Yondu. Even with the Bang trigger, Deadpool just did one damage to Yondu. Deadpool then used Bang on Star Lord again, but did not damage. Deadpool then used Leg Day to get out of line-of-sight and Range 3 of Yondu, Rocket, and Star Lord and within Range 5 of Apocalypse.
Yondu advanced into line-of-sight of Deadpool and attacked, using Hit and Run. He, however, did zero damage to Deadpool, but repositioned onto my left secure. This was extremely lucky on my part. Yondu then successfully flipped the secure.
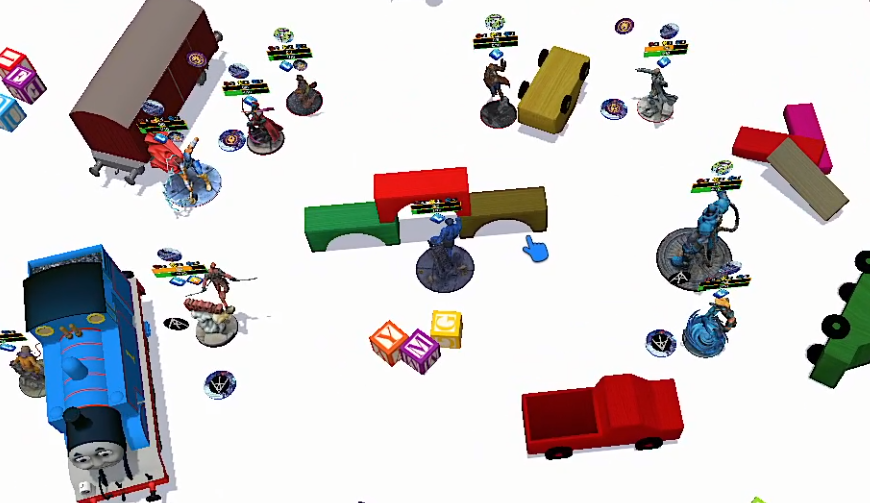
I went with Beast advanced him within two of Bill, Rocket, and Star Lord and applying Slow to them using Consuming Blight, generating three Evolution Tokens. I then had Beast move onto the secure that Yondu was on and attempt to flip it. He failed to do so. My opponent had Rocket open up on Beast, dealing three damage. Rocket then moved onto the closest secure. I then moved Magik onto the secure with Nick Fury. I was thinking that she could take down Nick Fury at the top of the next turn.
My opponent activated Bill, walked him within Range 2 of Deadpool and attacked him, doing … zero damage. He then used Bill’s throw to remove the line-of-sight-blocking terrain. I used Brace for Impact to negate the damage.

I had Toad walk onto the point and attack Yondu, hoping to get the push to make flipping the point easier. Toad did two damage, but did not get the wild and was unable to flip the secure.
At the end of Turn 2, my opponent scored 4 VPs and I scored 5 VPs.
Turn 3
In the power phase, I used Celestial Technology to bring Deadpool next to Apocalypse. With priority, my opponent used Lovable Misfits. Rocket got to attack Beast, dealing one damage. Bill got to also attack Beast, but, thanks to spending three power for rerolls using Star and Garters, Beast only took one damage.
My opponent used priority to attack Apocalypse with Nick Fury. He started by using Nick Fury’s spender on Apocalypse. Since I could use Sacrifice to make that attack target my one-health Deadpool, I think this may have been a mistake. My opponent maybe should have attacked Deadpool with a builder, hoping to daze him. That would have gotten me to Sacrifice the spender onto the full-health Magik, instead. Apocalypse ended up taking three damage from Nick Fury’s follow up builder.
I had Beast activate before he was dazed. He used Consuming Blight, giving Yondu and Bill the Root condition and generating two Evolution Tokens. He then tried, and failed, to flip the secure that he was on. Here is where I made a terrible mistake. I then made a terrible mistake and had him move into with Range 3 of Rocket, triggering Booby Traps. This dazed Beast mid-activation. The plan of attacking Star Lord would have also given away priority. I am still uncertain what the optimal play for Beast would have been, but it was definitely not what I chose to do. I did not really want to give Yondu or Bill power. Maybe the play was to Consuming Blight using Evolution Tokens, throw Yondu off the point, try to flip the point, and the either double move away from the fight but in a position to be Celestial Technologied next turn or behind the Size 4 train?

Regardless, my opponent then activated Star Lord had him double attack Apocalypse and Hit and Run away onto the closest secure. Star Lord ended up dealing zero damage to Apocalypse.
I then had Magik activate. She was able to KO Nick Fury and Journey Through Limbo Apocalypse into a better position, also healing him one. I made sure to position Apocalypse so that he could not be walked and attacked by Bill or double attacked by Yondu.

My opponent went with Yondo and attacked Toad. After spending three Evolution tokens on rerolls, Toad took four damage and was able to slippery onto the other side of the Size 4 train. Not wanting to give Bill power by attacking him with Apocalypse, I decided to just get Toad out of danger by shaking Slow, medium moving away, and using Hop to get into a safer position.

My opponent activated Rocket, advanced him within range of Magik, and attacked Magik. This movement took him just outside of Range 2 of the secure, which cost my opponent 1 VP. This dealt one damage and generated an Evolution Token, since Magik was assigned the War Horsemen Card. I activated Apocalypse and had him use Vanish Into Dust and a slowed advance to get within Range 3 of Star Lord. He then attacked Star Lord, dealing zero damage. This fluffed attack was reciprocated when my opponent activated Bill and attacked Apocalypse for zero damage.

Turn 3 ended with my opponent scoring 4 VPs and me scoring 4 VPs. This both of us on 13 total VPs.
Turn 4
During the power phase, I decided not to use Celestial technology to allow Apocalypse to use priority to Fury and spender into Bill, who had two conditions. I did so, resulting in a dazed Bill.

I then had Apocalypse builder into Star Lord, dazing him. My opponent responded by using Yondu’s spender. It dealt three damage to Beast, dazed, Apocalypse, dealt three damage to Magik, and dealt two damage to Deadpool. Yondu then attack Beast. Due to rerolls, Beast was left on one. Beast then activated, threw Rocket off of the secure, flipped the secure picked up an extract, and ran away. My opponent activated Rocket moved and then attacked and dazed Magik, generating one Evolution Token. That led the board in a state where I was garunteed to score out.
Epilogue
Again, I want to thank my opponent for making this game both enjoyable and a great learning experience. While I won and was able to execute my overall gameplan, I made many mistakes from which to learn. The deployment of Beast ended up costing him any Turn 1 impact and moving him to get dazed by Booby Trap was awful. I think that I did end up getting some good use out of Consuming Blight, though. I also positioned Deadpool too far forward on Turn 1. Regardless of these mistakes, I really liked the condition control and the mobility offered by the Servants of Apocalypse. This makes me excited to explore them more.
Next, I hope to bring you more battle reports for you and me to use as learning tools. As always, if you have any comments or critiques please reach out to me on Discord at professor_ulysses.
